Tuesday, December 25, 2012

Merry Christmas Everyone!


This advent calander took a while to make using my candy wrapper die, but I think it was worth it - it has given much pleasure to my kids this year and I think it will be used for many years to come!!!


Wishing your all a very Merry Christmas and a Happy & Peaceful New Year.
 
I hope to see you all in 2013...


Monday, December 24, 2012

Woohoo - 12 posts is a row!

Let's celebrate with one more...
 
 
This is a simple but effective card - great if you're making a few!.
 I used:
Soft Suede and Whisper White cardstock.
Champaign Glimmer Paper
Curly Cute and Snowflake Soiree sets
Rhinestone Jewel


Sunday, December 23, 2012

Day 12


Truly quick cards!
 
I used the Gift Labels from the Holiday Mini Catalogue to make some fab quick christmas cards - perfect when you're short on time but still want to send handmade cards.
I just added greetings and a bit of glitter to the labels and they make great card fronts.
Colours are Gumball Green and Cherry Cobber.

Saturday, December 22, 2012

Day 11

Ooh, almost there, just a few days to go....
I did a few versions of this card using my Snowflake Soiree set. It's an emboss resist technique, which means you emboss the cardstock then add colour on top by brayering or sponging. The colour takes to the card but not the embossed areas.


My favourite version of this card is as follows:
Island Indingo and Pool Party ink using a brayer
Island indigo and whisper white cardstock
Iridesent Ice embossing powder,
Rhinestone jewels


Friday, December 21, 2012

Thursday, December 20, 2012

Day 9

This is my take on the ornament shown on the front of the Holiday Mini Catalogue. However, I have a much smaller ornament, which is perfect for my tree, as I used the Delightful Decorations set and matching punch.


I Used: Old Olive Ink, Delightful Decorations set, Decoration punch, Read Red DSP, Faceted clear button, Pearl Jewel


Quick Quiz - spot the error in the photo....oops!!

Wednesday, December 19, 2012

Day 8

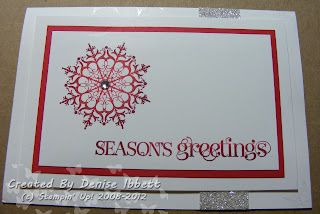
A super simple card but effective I think... I was suprised how much I actually liked the red snowflake when it was complete!


I used: Whisper White & Real Red cardstock, Silver Glimmer Paper, Read Red and Cherry Cobbler ink, Rhinestone Jewel, Illuminate Ink.

Have fun with this one...

Tuesday, December 18, 2012

day 7

Here is a project inspried by one we were shown at a recent Stampin' Up Training Day....
 
 
Mine is now hung on my front door!
 
I used:
Basic Colours = Very Vanilla, Cherry Cobbler, Chocolate Chip, Lucky Limeade.
Assorted co-ordinating DSP
All cut out using my Blossom Party Die and my Big Shot.
 
This is where my Big Shot came in REALLY handy, as I could cut 5 layers of cardstock at one time!!


Monday, December 17, 2012

Day 6

This was inspired by card I saw online recently and I just LOVED the colours, so here's my take on it...

I used  Whisper White and Elegant Eggplant cardstock, Champaing Shimmer Paper and Gold embossing powder. I stamped using my 'Snowflake Soiree' set.

Check back again tomorrow for more ideas...

Sunday, December 16, 2012

Day 5


Here's a cute and quick card using Silver Shimmer Paper with the Snowflake Bigz Die. The base card is Cherry Cobbler with co-ordinating DSP from the Festive paper stack in the Holiday Mini Catalogue. I've used Island Indigo ribbon and my 'Curly Cute stamp set.
Done!

Saturday, December 15, 2012

Day 4

These cards were makd by altering my shimmer paper. I started off with Silver Shimmer paper, which I had die cut using my Snowflake Bigz Die. I then added Real Red and Gumball Green ink using a dawber. Lastly, I left it to dry - it least overnight - before I assembeled my card.


Cardstock - Whisper White, Gumball Green Shimmer Paper
Stamp Set; Snowflake Soiree
Other: Real Red ink, Snow Flurries emgossing folder

Friday, December 14, 2012

Day 3

Another card using my Evergreen stamp set, but this itme I used the thrid tree just by itself. For the Gumball Green background I embossed the Core'dinations cardstock and sanded away the top layed to reveal the lighter green layer underneath.


Cardstock: Cherry Cobbler, Whisper White, Gumball Green Core'dinations & a scrap of DSP
Ink: Gumball Green
Other: Embossing folder, sanding block, Rhinestone
 

Thursday, December 13, 2012

Day 2

Here's a card I made using the new 'Evergreen' stamp set, which I especially like as it's so flexible - you can use the trees together or seperately and can use the set for lots of different techniques.

For this card I used two of the tree stamps. I also embossed the verse using gold embossing powder and tipped it on it's side so it's more like a speciality DSP than a greeting.


Cardstock: Early Espresso, Very Vanilla, Gumball Green, Rose Red, Champaign Shimmer Paper
Stamp Sets: Evergreen, Teeny Tiny Sentiments
Other: Gold embossing powder, corner rounder punch, jewelry tag punch, Bakers Twine`

Wednesday, December 12, 2012

12 Days of Christmas - Day 1

Ok, I know what you're all thinking... "about time she posted on that blog again!"... so I have decided to have a Christmas blitz and post 12 projects on the 12 days running up to Christmas.

I'm guessing you'd rather see photos of the projects than read a whole lot of 'blurb' so I will keep each post brief with just a basic list of colours & tools.

Here's the first....


Using Early Espresso & Whisper White Cardstock, the Snow Flurries Bigz Die with Champaign Shimmer Paper, greeting from 'Snowflake Soiree' set, an Old Olive button and DSP from the Festive Paper Pack.

I hope it inspires you...


Sunday, November 11, 2012

Blogging

Ok, so here we are again....

Having received 2 comments on the same day about my lack of blog updates I have been inspried to get back online and post again. I had even stopped taking photos of my recent cards so will have to go back and take a few snap shots! 

Here's a picture of a card I DID photograph.... It's a great way to use the Dinoroar Stamp Set if you don't want to colour the dinosaurs.

  1. I used Old Olive cardstock and removed the centre of the card using the Framelets die and my Big Shot.
  2. I stamped some grass in Old Olive and stamped some dinosaurs on the background using Early Espresso ink. I used acetate to fill in the hole.
  3. I also use Ealry Espresso ink to stamp 2 dino's on DSP (Really Rust and More Mustard) then cut them out and attached one them to the front of the card using dimentionals.
  4. I stamped the insert with a greeting and used my brayer to add some colour for the grass and sky (not sure you can see that in the photos though). Then I attached the second dino to the insert so he can be seen through the acetate 'window'.
  5. Done.

 
 I'm also about to update my class schedule for anyone who would like to come along to classes before Christmas.

Wednesday, April 18, 2012

I made these baskets for Easter this year but they are great for any occasion. Even better, they are quick and easy to make.... 

  1. You can start with a square of cardstock of any size as long as you can divide it up equally into thrids. Here I have used a 6" x 6" square and scored at 2" and 4" on both sides so you end up with 9 squares that measure 2" x 2" each.
  2. Next, fold along each score line and cut where indicated with an orange line.
  3. Lastly, fold up your box, but don't fold two of the sides all the way up, leave them at an angle. Adhere with Sticky strip.
  4. Add a handle if required and decorate the sides of your box - here I used my Big SHot to die cut some cute flowers.

Have Fun!